|
|
|
|
|
Bientôt | |
|
|
|
| Home | Technique | Women | Maternity | Beast | Paprail | CV et Exhibitions | Guest (in french) | Links | French |
The creation of a bronze sculpture involves several steps, which are not generally well understood (even by the well-informed). This is an opportunity for you to discover the procedures involved, from the initial rough idea and sketch to the finished work, via the casting using the ìcire perdueî or ìlost waxî method. |
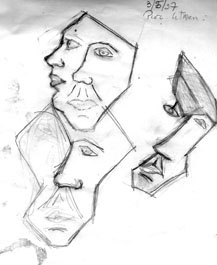
Step 1. The sketch
|
The starting point of the sculpture is often a
simple drawing, sketched hastily according to inspiration
and then perfected to balance lines and adjust proportions.
But this sketch only has 2 dimensions whereas a sculpture
has 3. I must therefore constantly imagine the volume and
the different perspectives of the work. |
Step 2. The modeling
Once the plan has been made, the actual realisation of the sculpture begins. A block of bronze is not directly modeled as is stone or wood. I usually do the original sculpture in wax first but may also do this in some other material like wood, stone or papier mâché. It all depends on the subject. |
|
|
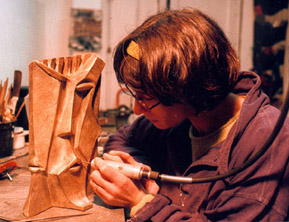
Modeling : For small sculptures, I use wax which I
have prepared myself, although this can be bought ready
made. Modeling wax softens to a low enough temperature to be
worked by hand to achieve at least the general form of the
sculpture. For more detail, precise tools (a dentists
spatula, for example) are essential and these are heated by
flame. |
Original or Limited edition. For a original piece, the wax is given directly to the founder. On the other hand, if several copies are required, a mould has to be made. The mould stage is also essential if the original is in wood or stone and if the founder uses the lost wax method. In this case, the mould is used to produce a wax copy. |
|
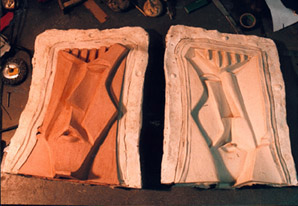
Step 3. The mould
|
Creation of a mould : this is an important stage as it determines the quality of the future copies. The mould usually consists of between 1 and about 10 parts, depending on the complexity of the sculpture. The negative impression of the sculpture is taken, a section at a time, using a maliable substance called ìélastomèreî which is held in place by a layer of plaster (or fibreglass). When all the parts have been assembled, the inside cavity of the mould is ready to provide an exact reproduction of the original |
|
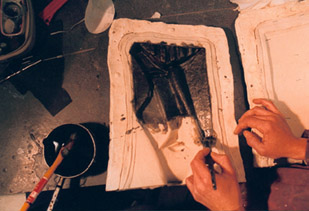
The wax copy : the wax is simply heated in a
suitable vessel until molten and then poured into the funnel
in the mould. If all goes according to plan, the wax spreads
out into all the details of the inside cavity. |
Numbering of pieces : 8 copies can be made from a bronze sculpture, these are numbered from 1/8 to 8/8. The artist is also allowed 4 extra copies ; the artists proofs?, numbered from I/IV to IV/IV. If a sculpture is copied more than 8 times it is no longer considered a work of art in the strict sense but rather a commercial piece. |
|
|
When the wax is removed from the mould, some of the lines still have to be re-worked as a copy never gives a perfect reproduction of the original. Once this has been done, it is ready to go to the founder for its transformation into bronze. |
Stage 4. The founding
The founding (in this case, using the lost wax method) is the only stage which I donít carry out myself. |
|
Picture is coming soon |
Preparation of the wax : The founders first job is to create a system of channels around the wax, to ensure that the liquid metal spreads to all the details in the piece. For this, he carefully places small wax rods onto the sculpture. |
Picture is coming soon |
The Investment : The founder then forms a plaster investment around the sculpture and its channels, to which he will then pour the molton metaal. When the plaster is dry, it is then placed in an oven to melt the wax which then escapes from the mould. The wax is then ìlostî (hence the origin of the name of the process) but the mould retains itís hollow imprint. The mould is then baked in an oven to a high temperature so that it will resist the intense heat of the molton metal. After baking, the mould is removed from the oven and is then ready for casting. |
Picture is coming soon |
The casting : it is a both spectacular and
delicate moment. The bronze ingots are placed in a crucible
which is heated until the metal liquifies. Once it reaches
the right temperature, the metal is poured into the mould
through the funnel. This is then left to cool for at least a
few hours before the plaster mould is broken to remove the
piece which is now made of bronze. |
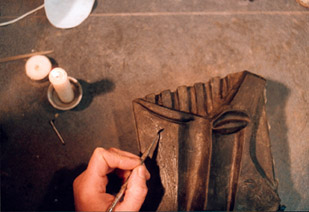
Stage 5. The chasing
|
This is the point at which I take my sculpture into my own hands again as I now must rework the lines and texture and remove any defects caused by the mould. Wearing protective goggles and a mask, I use an electric sander to hunt out the last imperfections. |
|
Once this chasing or chiseling is completed, the sculpture now conforms to my initial idea and is ready for the final touch. |
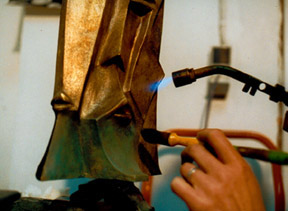
Stage 6. the hot patina
|
This final stage is no doubt the most spectacular part of the process but also one of the most difficult to master. A solution of mineral pigments is applied to the bronze and fixed using a blowlamp. An infinate number of variations of green, blue, brown or black are possible. The obtaining of a good colour depends on the heat (the piece must be heated to the right temperature) and on the mixture of pigments. A certain amount of experience is necessary to achieve a good patina. This is, in fact, a specialists job itself but I prefer to realise this final touch myself. |
|
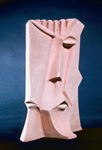
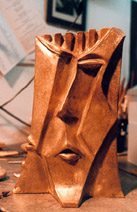
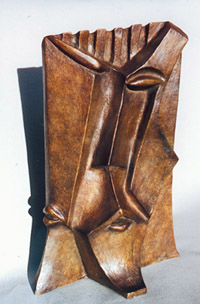
Now "L'Homme Anguleux" is ready to be exhibited |
| Contacter Hélène Saïnz (dans votre mail changer AROBASE par @) |
|